A Game of Maps
Have you ever wondered how "Google Maps" might be working in the background?
Have you watched "Game of Thrones" and been confused about where all of the castles and cities are located in relation to each other?
Do you not care about "Game of Thrones", but still want a guide to setting up a Node.js server with PostgreSQL and Redis?
In this 20 minute tutorial, we'll walk through building a Node.js API to serve geospatial "Game of Thrones" data from PostgreSQL (with the PostGIS extension) and Redis.
Part II of this series provides a tutorial on building a "Google Maps" style web application to visualize the data from this API.
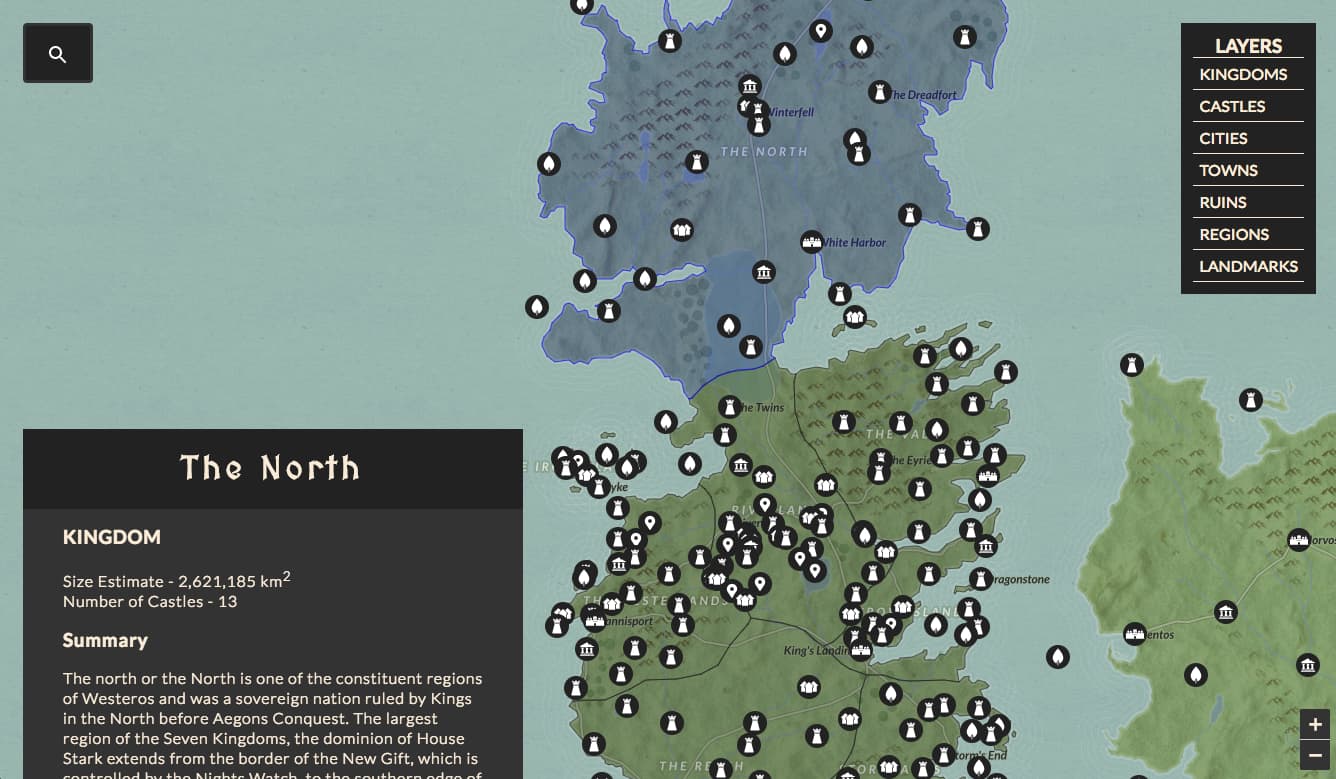
Check out https://atlasofthrones.com/ for a preview of the final product.
Step 0 - Setup Local Dependencies
Before starting, we'll need to install the project dependencies.
0.0 - PostgreSQL and PostGIS
The primary datastore for this app is PostgreSQL. Postgres is a powerful and modern SQL database, and is a very solid choice for any app that requires storing and querying relational data. We'll also be using the PostGIS spatial database extender for Postgres, which will allow us to run advanced queries and operations on geographic datatypes.
This page contains the official download and installation instructions for PostgreSQL - https://www.postgresql.org/download/
Another good resource for getting started with Postgres can be found here - http://postgresguide.com/setup/install.html
If you are using a version of PostgreSQL that does not come bundled with PostGIS, you can find installation guides for PostGIS here -
http://postgis.net/install/
0.1 - Redis
We'll be using Redis in order to cache API responses. Redis is an in-memory key-value datastore that will enable our API to serve data with single-digit millisecond response times.
Installation instructions for Redis can be found here - https://redis.io/topics/quickstart
0.2 - Node.js
Finally, we'll need Node.js v7.6 or above to run our core application server and endpoint handlers, and to interface with the two datastores.
Installation instructions for Node.js can be found here -
https://nodejs.org/en/download/
Step 1 - Getting Started With Postgres
1.0 - Download Database Dump
To keep things simple, we'll be using a pre-built database dump for this project.
The database dump contains polygons and coordinate points for locations in the "Game of Thrones" world, along with their text description data. The geo-data is based on multiple open source contributions, which I've cleaned and combined with text data scraped from A Wiki of Ice and Fire, Game of Thrones Wiki, and WesterosCraft. More detailed attribution can be found here.
In order to load the database locally, first download the database dump.
wget https://cdn.patricktriest.com/atlas-of-thrones/atlas_of_thrones.sql
1.1 - Create Postgres User
We'll need to create a user in the Postgres database.
If you already have a Postgres instance with users/roles set up, feel free to skip this step.
Run psql -U postgres on the command line to enter the Postgres shell as the default postgres user. You might need to run this command as root (with sudo) or as the Postgres user in the operating system (with sudo -u postgres psql) depending on how Postgres is installed on your machine.
psql -U postgres
Next, create a new user in Postgres.
CREATE USER patrick WITH PASSWORD 'the_best_passsword';
In case it wasn't obvious, you should replace patrick and the_best_passsword in the above command with your desired username and password respectively.
1.2 - Create "atlas_of_thrones" Database
Next, create a new database for your project.
CREATE DATABASE atlas_of_thrones;
Grant query privileges in the new database to your newly created user.
GRANT ALL PRIVILEGES ON DATABASE atlas_of_thrones to patrick;
GRANT SELECT ON ALL TABLES IN SCHEMA public TO patrick;
Then connect to this new database, and activate the PostGIS extension.
\c atlas_of_thrones
CREATE EXTENSION postgis;
Run \q to exit the Postgres shell.
1.3 - Import Database Dump
Load the downloaded SQL dump into your newly created database.
psql -d atlas_of_thrones < atlas_of_thrones.sql
1.4 - List Databse Tables
If you've had no errors so far, congrats!
Let's enter the atlas_of_thrones database from the command line.
psql -d atlas_of_thrones -U patrick
Again, substitute "patrick" here with your username.
Once we're in the Postgres shell, we can get a list of available tables with the \dt command.
\dt
             List of relations
 Schema |      Name       | Type  |  Owner
--------+-----------------+-------+---------
 public | kingdoms        | table | patrick
 public | locations       | table | patrick
 public | spatial_ref_sys | table | patrick
(3 rows)
1.5 - Inspect Table Schema
We can inspect the schema of an individual table by running
\d kingdoms
                                      Table "public.kingdoms"
  Column   |             Type             |                        Modifiers
-----------+------------------------------+---------------------------------------------------------
 gid       | integer                      | not null default nextval('political_gid_seq'::regclass)
 name      | character varying(80)        |
 claimedby | character varying(80)        |
 geog      | geography(MultiPolygon,4326) |
 summary   | text                         |
 url       | text                         |
Indexes:
    "political_pkey" PRIMARY KEY, btree (gid)
    "political_geog_idx" gist (geog)
1.6 - Query All Kingdoms
Now, let's get a list of all of the kingdoms, with their corresponding names, claimants, and ids.
SELECT name, claimedby, gid FROM kingdoms;
       name       |   claimedby   | gid
------------------+---------------+-----
 The North        | Stark         |   5
 The Vale         | Arryn         |   8
 The Westerlands  | Lannister     |   9
 Riverlands       | Tully         |   1
 Gift             | Night's Watch |   3
 The Iron Islands | Greyjoy       |   2
 Dorne            | Martell       |   6
 Stormlands       | Baratheon     |   7
 Crownsland       | Targaryen     |  10
 The Reach        | Tyrell        |  11
(10 rows)
Nice! If you're familiar with Game of Thrones, these names probably look familiar.
1.7 - Query All Location Types
Let's try out one more query, this time on the location table.
SELECT DISTINCT type FROM locations;
   type
----------
 Landmark
 Ruin
 Castle
 City
 Region
 Town
(6 rows)
This query returns a list of available location entity types.
Go ahead and exit the Postgres shell with \q.
Step 2 - Setup NodeJS project
2.0 - Clone Starter Repository
Run the following commands to clone the starter project and install the dependencies
git clone -b backend-starter https://github.com/triestpa/Atlas-Of-Thrones
cd Atlas-Of-Thrones
npm install
The starter branch includes a base directory template, with dependencies declared in package.json. It is configured with ESLint and JavaScript Standard Style.
If the lack of semicolons in this style guide makes you uncomfortable, that's fine, you're welcome to switch the project to another style in the
.eslintrc.jsconfig.
2.1 - Add .env file
Before starting, we'll need to add a .env file to the project root in order to provide environment variables (such as database credentials and CORs configuration) for the Node.js app to use.
Here's a sample .env file with sensible defaults for local development.
PORT=5000
DATABASE_URL=postgres://patrick:@localhost:5432/atlas_of_thrones?ssl=false
REDIS_HOST=localhost
REDIS_PORT=6379
CORS_ORIGIN=http://localhost:8080
You'll need to change the "patrick" in the DATABASE_URL entry to match your Postgres user credentials. Unless your name is Patrick, that is, in which case it might already be fine.
A very simple index.js file with the following contents is in the project root directory.
require('dotenv').config()
require('./server')
This will load the variables defined in .env into the process environment, and will start the app defined in the server directory. Now that everything is setup, we're (finally) ready to actually begin building our app!
Setting authentication credentials and other environment specific configuration using ENV variables is a good, language agnostic way to handle this information. For a tutorial like this it might be considered overkill, but I've encountered quite a few production Node.js servers that are omitting these basic best practices (using hardcoded credentials checked into Git for instance). I imagine these bad practices may have been learned from tutorials which skip these important steps, so I try to focus my tutorial code on providing examples of best practices.
Step 3 - Initialize basic Koa server
We'll be using Koa.js as an API framework. Koa is a sequel-of-sorts to the wildly popular Express.js. It was built by the same team as Express, with a focus on minimalism, clean control flow, and modern conventions.
3.0 - Import Dependencies
Open server/index.js to begin setting up our server.
First, import the required dependencies at the top of the file.
const Koa = require('koa')
const cors = require('kcors')
const log = require('./logger')
const api = require('./api')
3.1 - Initialize App
Next, we'll initialize our Koa app, and retrieve the API listening port and CORs settings from the local environment variables.
Add the following (below the imports) in server/index.js.
// Setup Koa app
const app = new Koa()
const port = process.env.PORT || 5000

// Apply CORS config
const origin = process.env.CORS_ORIGIN | '*'
app.use(cors({ origin }))
3.2 - Define Default Middleware
Now we'll define two middleware functions with app.use. These functions will be applied to every request. The first function will log the response times, and the second will catch any errors that are thrown in the endpoint handlers.
Add the following code to server/index.js.
// Log all requests
app.use(async (ctx, next) => {
  const start = Date.now()
  await next() // This will pause this function until the endpoint handler has resolved
  const responseTime = Date.now() - start
  log.info(`${ctx.method} ${ctx.status} ${ctx.url} - ${responseTime} ms`)
})

// Error Handler - All uncaught exceptions will percolate up to here
app.use(async (ctx, next) => {
  try {
    await next()
  } catch (err) {
    ctx.status = err.status || 500
    ctx.body = err.message
    log.error(`Request Error ${ctx.url} - ${err.message}`)
  }
})
Koa makes heavy use of async/await for handling the control flow of API request handlers. If you are unclear on how this works, I would recommend reading these resources -
- Node 7.6 + Koa 2: Asynchronous Flow Control Made Right
- Koa Github Readme
- Async/Await Will Make Your Code Simpler
3.3 - Add Logger Module
You might notice that we're using log.info and log.error instead of console.log in the above code. In Node.js projects, it's really best to avoid using console.log on production servers, since it makes it difficult to monitor and retain application logs. As an alternative, we'll define our own custom logging configuration using winston.
Add the following code to server/logger.js.
const winston = require('winston')
const path = require('path')

// Configure custom app-wide logger
module.exports = new winston.Logger({
  transports: [
    new (winston.transports.Console)(),
    new (winston.transports.File)({
      name: 'info-file',
      filename: path.resolve(__dirname, '../info.log'),
      level: 'info'
    }),
    new (winston.transports.File)({
      name: 'error-file',
      filename: path.resolve(__dirname, '../error.log'),
      level: 'error'
    })
  ]
})
Here we're just defining a small logger module using the winston package. The configuration will forward our application logs to two locations - the command line and the log files. Having this centralized configuration will allow us to easily modify logging behavior (say, to forward logs to an ELK server) when transitioning from development to production.
3.4 - Define "Hello World" Endpoint
Now open up the server/api.js file and add the following imports.
const Router = require('koa-router')
const database = require('./database')
const cache = require('./cache')
const joi = require('joi')
const validate = require('koa-joi-validate')
In this step, all we really care about is the koa-router module.
Below the imports, initialize a new API router.
const router = new Router()
Now add a simple "Hello World" endpoint.
// Hello World Test Endpoint
router.get('/hello', async ctx => {
  ctx.body = 'Hello World'
})
Finally, export the router at the bottom of the file.
module.exports = router
3.5 - Start Server
Now we can mount the endpoint route(s) and start the server.
Add the following at the end of server/index.js.
// Mount routes
app.use(api.routes(), api.allowedMethods())

// Start the app
app.listen(port, () => { log.info(`Server listening at port ${port}`) })
3.6 - Test The Server
Try starting the server with npm start. You should see the output Server listening at port 5000.
Now try opening http://localhost:5000/hello in your browser. You should see a "Hello World" message in the browser, and a request log on the command line. Great, we now have totally useless API server. Time to add some database queries.
Step 4 - Add Basic Postgres Integraton
4.0 - Connect to Postgres
Now that our API server is running, we'll want to connect to our Postgres database in order to actually serve data. In the server/database.js file, we'll add the following code to connect to our database based on the defined environment variables.
const postgres = require('pg')
const log = require('./logger')
const connectionString = process.env.DATABASE_URL

// Initialize postgres client
const client = new postgres.Client({ connectionString })

// Connect to the DB
client.connect().then(() => {
  log.info(`Connected To ${client.database} at ${client.host}:${client.port}`)
}).catch(log.error)
Try starting the server again with npm start. You should now see an additional line of output.
info: Server listening at 5000
info: Connected To atlas_of_thrones at localhost:5432
4.1 - Add Basic "NOW" Query
Now let's add a basic query test to make sure that our database and API server are communicating correctly.
In server/database.js, add the following code at the bottom -
module.exports = {
  /** Query the current time */
  queryTime: async () => {
    const result = await client.query('SELECT NOW() as now')
    return result.rows[0]
  }
}
This will perform one the simplest possible queries (besides SELECT 1;) on our Postgres database: retrieving the current time.
4.2 - Connect Time Query To An API Route
In server/api.js add the following route below our "Hello World" route.
// Get time from DB
router.get('/time', async ctx => {
  const result = await database.queryTime()
  ctx.body = result
})
Now, we've defined a new endpoint, /time, which will call our time Postgres query and return the result.
Run npm start and visit http:/localhost:5000/time in the browser. You should see a JSON object containing the current UTC time. Ok cool, we're now serving information from Postgres over our API. The server is still a bit boring and useless though, so let's move on to the next step.
Step 5 - Add Geojson Endpoints
Our end goal is to render our "Game of Thrones" dataset on a map. To do so, we'll need to serve our data in a web-map friendly format: GeoJSON. GeoJSON is a JSON specification (RFC 7946), which will format geographic coordinates and polygons in a way that can be natively understood by browser-based map rendering tools.
Note - If you want to minimize payload size, you could convert the GeoJSON results to TopoJSON, a newer format that is able to represent shapes more efficiently by eliminating redundancy. Our GeoJSON results are not prohibitively large (around 50kb for all of the Kingdom shapes, and less than 5kb for each set of location types), so we won't bother with that in this tutorial.
5.0 - Add GeoJSON Queries
In the server/database.js file, add the following functions under the queryTime function, inside the module.exports block.
/** Query the locations as geojson, for a given type */
getLocations: async (type) => {
  const locationQuery = `
    SELECT ST_AsGeoJSON(geog), name, type, gid
    FROM locations
    WHERE UPPER(type) = UPPER($1);`
  const result = await client.query(locationQuery, [ type ])
  return result.rows
},

/** Query the kingdom boundaries */
getKingdomBoundaries: async () => {
  const boundaryQuery = `
    SELECT ST_AsGeoJSON(geog), name, gid
    FROM kingdoms;`
  const result = await client.query(boundaryQuery)
  return result.rows
}
Here, we are using the ST_AsGeoJSON function from PostGIS in order to convert the polygons and coordinate points to browser-friendly GeoJSON. We are also retrieving the name and id for each entry.
Note that in the location query, we are not directly appending the provided type to the query string. Instead, we're using
$1as a placeholder in the query string and passing the type as a parameter to theclient.querycall. This is important since it will allow the Postgres to sanitize the "type" input and prevent SQL injection attacks.
5.1 - Add GeoJSON Endpoint
In the server/api.js file, declare the following endpoints.
router.get('/locations/:type', async ctx => {
  const type = ctx.params.type
  const results = await database.getLocations(type)
  if (results.length === 0) { ctx.throw(404) }

  // Add row metadata as geojson properties
  const locations = results.map((row) => {
    let geojson = JSON.parse(row.st_asgeojson)
    geojson.properties = { name: row.name, type: row.type, id: row.gid }
    return geojson
  })

  ctx.body = locations
})

// Respond with boundary geojson for all kingdoms
router.get('/kingdoms', async ctx => {
  const results = await database.getKingdomBoundaries()
  if (results.length === 0) { ctx.throw(404) }

  // Add row metadata as geojson properties
  const boundaries = results.map((row) => {
    let geojson = JSON.parse(row.st_asgeojson)
    geojson.properties = { name: row.name, id: row.gid }
    return geojson
  })

  ctx.body = boundaries
})
Here, we are are executing the corresponding Postgres queries and awaiting each response. We are then mapping over each result row to add the entity metadata as GeoJSON properties.
5.2 - Test the GeoJSON Endpoints
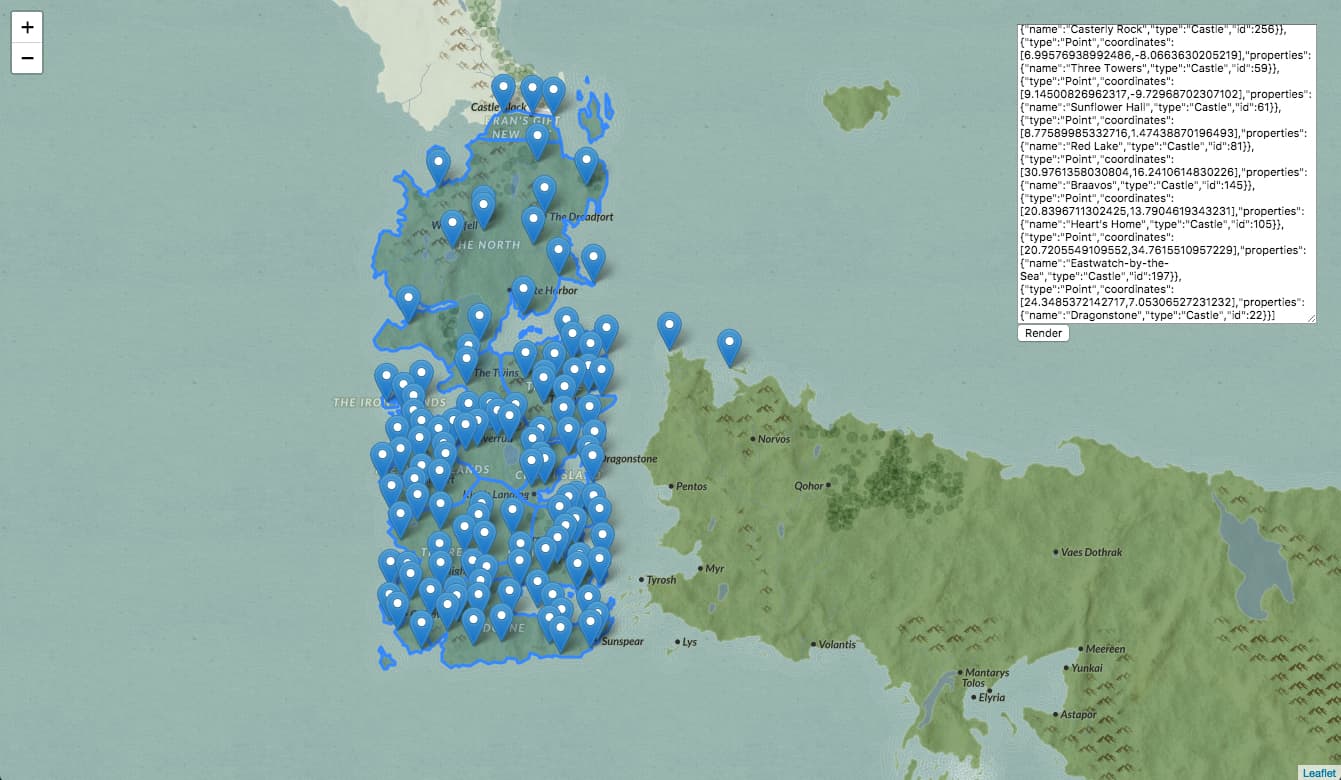
I've deployed a very simple HTML page here to test out the GeoJSON responses using Leaflet.
In order to provide a background for the GeoJSON data, the test page loads a sweet "Game of Thrones" basemap produced by Carto. This simple HTML page is also included in the starter project, in the geojsonpreview directory.
Start the server (npm start) and open http://localhost:5000/kingdoms in your browser to download the kingdom boundary GeoJSON. Paste the response into the textbox in the "geojsonpreview" web app, and you should see an outline of each kingdom. Clicking on each kingdom will reveal the geojson properties for that polygon.
Now try the adding the GeoJSON from the location type endpoint - http://localhost:5000/locations/castle
Pretty cool, huh?
If your interested in learning more about rendering these GeoJSON results, be sure to check back next week for part II of this tutorial, where we'll be building out the webapp using our API - https://atlasofthrones.com/
Step 6 - Advanced PostGIS Queries
Now that we have a basic GeoJSON service running, let's play with some of the more interesting capabilities of PostgreSQL and PostGIS.
6.0 - Calculate Kingdom Sizes
PostGIS has a function called ST_AREA that can be used to calculate the total area covered by a polygon. Let's add a new query to calculate the total area for each kingdom of Westeros.
Add the following function to the module.exports block in server/database.js.
/** Calculate the area of a given region, by id */
getRegionSize: async (id) => {
  const sizeQuery = `
      SELECT ST_AREA(geog) as size
      FROM kingdoms
      WHERE gid = $1
      LIMIT(1);`
  const result = await client.query(sizeQuery, [ id ])
  return result.rows[0]
},
Next, add an endpoint in server/api.js to execute this query.
// Respond with calculated area of kingdom, by id
router.get('/kingdoms/:id/size', async ctx => {
  const id = ctx.params.id
  const result = await database.getRegionSize(id)
  if (!result) { ctx.throw(404) }

  // Convert response (in square meters) to square kilometers
  const sqKm = result.size * (10 ** -6)
  ctx.body = sqKm
})
We know that the resulting units are in square meters because the geography data was originally loaded into Postgres using an EPSG:4326 coordinate system.
While the computation is mathematically sound, we are performing this operation on a fictional landscape, so the resulting value is an estimate at best. These computations put the entire continent of Westeros at about 9.5 million square kilometers, which actually sounds about right compared to Europe, which is 10.18 million square kilometers.
Now you can call, say, http://localhost:5000/kingdoms/1/size to get the size of a kingdom (in this case "The Riverlands") in square kilometers. You can refer to the table from step 1.3 to link each kingdom with their respective id.
6.1 - Count Castles In Each Kingdom
Using PostgreSQL and PostGIS, we can even perform geospatial joins on our dataset!
In SQL terminology, a JOIN is when you combine columns from more than one table in a single result.
For instance, let's create a query to count the number of castles in each kingdom. Add the following query function to our server/database.js module.
/** Count the number of castles in a region, by id */
countCastles: async (regionId) => {
  const countQuery = `
    SELECT count(*)
    FROM kingdoms, locations
    WHERE ST_intersects(kingdoms.geog, locations.geog)
    AND kingdoms.gid = $1
    AND locations.type = 'Castle';`
  const result = await client.query(countQuery, [ regionId ])
  return result.rows[0]
},
Easy! Here we're using ST_intersects, a PostGIS function to find interections in the geometries. The result will be the number of locations coordinates of type Castle that intersect with the specified kingdom boundaries polygon.
Now we can add an API endpoint to /server/api.js in order to return the results of this query.
// Respond with number of castle in kingdom, by id
router.get('/kingdoms/:id/castles', async ctx => {
  const regionId = ctx.params.id
  const result = await database.countCastles(regionId)
  ctx.body = result ? result.count : ctx.throw(404)
})
If you try out http://localhost:5000/kingdoms/1/castles you should see the number of castles in the specified kingdom. In this case, it appears the "The Riverlands" contains eleven castles.
Step 7 - Input Validation
We've been having so much fun playing with PostGIS queries that we've forgotten an essential part of building an API - Input Validation!
For instance, if we pass an invalid ID to our endpoint, such as http://localhost:5000/kingdoms/gondor/castles, the query will reach the database before it's rejected, resulting in a thrown error and an HTTP 500 response. Not good!
A naive approach to this issue would have us manually checking each query parameter at the beginning of each endpoint handler, but that's tedious and difficult to keep consistent across multiple endpoints, let alone across a larger team.
Joi is a fantastic library for validating Javascript objects. It is often paired with the Hapi.js framework, since it was built by the Hapi.js team. Joi is framework agnostic, however, so we can use it in our Koa app without issue.
We'll use the koa-joi-validate NPM package to generate input validation middleware.
Disclaimer - I'm the author of
koa-joi-validate. It's a very short module that was built for use in some of my own projects. If you don't trust me, feel free to just copy the code into your own project - it's only about 50 lines total, andJoiis the only dependency (https://github.com/triestpa/koa-joi-validate/blob/master/index.js).
In server/api.js, above our API endpoint handlers, we'll define two input validation functions - one for validating IDs, and one for validating location types.
// Check that id param is valid number
const idValidator = validate({
  params: { id: joi.number().min(0).max(1000).required() }
})

// Check that query param is valid location type
const typeValidator = validate({
  params: { type: joi.string().valid(['castle', 'city', 'town', 'ruin', 'landmark', 'region']).required() }
})
Now, with our validators defined, we can use them as middleware to each route in which we need to parse URL parameter input.
router.get('/locations/:type', typeValidator, async ctx => {
...
}

router.get('/kingdoms/:id/castles', idValidator, async ctx => {
...
}

router.get('/kingdoms/:id/size', idValidator, async ctx => {
...
}
Ok great, problem solved. Now if we try to pull any sneaky http://localhost:5000/locations/;DROP%20TABLE%20LOCATIONS; shenanigans the request will be automatically rejected with an HTTP 400 "Bad Request" response before it even hits our endpoint handler.
Step 8 - Retrieving Summary Data
Let's add one more set of endpoints now, to retrieve the summary data and wiki URLs for each kingdom/location.
8.0 - Add Summary Postgres Queries
Add the following query function to the module.exports block in server/database.js.
/** Get the summary for a location or region, by id */
getSummary: async (table, id) => {
  if (table !== 'kingdoms' && table !== 'locations') {
    throw new Error(`Invalid Table - ${table}`)
  }

  const summaryQuery = `
      SELECT summary, url
      FROM ${table}
      WHERE gid = $1
      LIMIT(1);`
  const result = await client.query(summaryQuery, [ id ])
  return result.rows[0]
}
Here we're taking the table name as a function parameter, which will allow us to reuse the function for both tables. This is a bit dangerous, so we'll make sure it's an expected table name before appending it to the query string.
8.1 - Add Summary API Routes
In server/api.js, we'll add endpoints to retrieve this summary data.
// Respond with summary of kingdom, by id
router.get('/kingdoms/:id/summary', idValidator, async ctx => {
  const id = ctx.params.id
  const result = await database.getSummary('kingdoms', id)
  ctx.body = result || ctx.throw(404)
})

// Respond with summary of location , by id
router.get('/locations/:id/summary', idValidator, async ctx => {
  const id = ctx.params.id
  const result = await database.getSummary('locations', id)
  ctx.body = result || ctx.throw(404)
})
Ok cool, that was pretty straightforward.
We can test out the new endpoints with, say, localhost:5000/locations/1/summary, which should return a JSON object containing a summary string, and the URL of the wiki article that it was scraped from.
Step 9 - Integrate Redis
Now that all of the endpoints and queries are in place, we'll add a request cache using Redis to make our API super fast and efficient.
9.0 - Do We Actually Need Redis?
No, not really.
So here's what happened - The project was originally hitting the Mediawiki APIs directly for each location summary, which was taking around 2000-3000 milliseconds per request. In order to speed up the summary endpoints, and to avoid overloading the wiki API, I added a Redis cache to the project in order to save the summary data responses after each Mediawiki api call.
Since then, however, I've scraped all of the summary data from the wikis and added it directly to the database. Now that the summaries are stored directly in Postgres, the Redis cache is much less necessary.
Redis is probably overkill here since we won't really be taking advantage of its ultra-fast write speeds, ACID compliance, and other useful features (like being able to set expiry dates on key entries). Additionally, Postgres has its own in-memory query cache, so using Redis won't even be that much faster.
Despite this, we'll throw it into our project anyway since it's easy, fun, and will hopefully provide a good introduction to using Redis in a Node.js project.
9.1 - Add Cache Module
First, we'll add a new module to connect with Redis, and to define two helper middleware functions.
Add the following code to server/cache.js.
const Redis = require('ioredis')
const redis = new Redis(process.env.REDIS_PORT, process.env.REDIS_HOST)

module.exports = {
  /** Koa middleware function to check cache before continuing to any endpoint handlers */
  async checkResponseCache (ctx, next) {
    const cachedResponse = await redis.get(ctx.path)
    if (cachedResponse) { // If cache hit
      ctx.body = JSON.parse(cachedResponse) // return the cached response
    } else {
      await next() // only continue if result not in cache
    }
  },
  /** Koa middleware function to insert response into cache */
  async addResponseToCache (ctx, next) {
    await next() // Wait until other handlers have finished
    if (ctx.body && ctx.status === 200) { // If request was successful
      // Cache the response
      await redis.set(ctx.path, JSON.stringify(ctx.body))
    }
  }
}
The first middleware function (checkResponseCache) here will check the cache for the request path (/kingdoms/5/size, for example) before continuing to the endpoint handler. If there is a cache hit, the cached response will be returned immediately, and the endpoint handler will not be called.
The second middleware function (addResponseToCache) will wait until the endpoint handler has completed, and will cache the response using the request path as a key. This function will only ever be executed if the response is not yet in the cache.
9.2 - Apply Cache Middleware
At the beginning of server/api.js, right after const router = new Router(), apply the two cache middleware functions.
// Check cache before continuing to any endpoint handlers
router.use(cache.checkResponseCache)

// Insert response into cache once handlers have finished
router.use(cache.addResponseToCache)
That's it! Redis is now fully integrated into our app, and our response times should plunge down into the optimal 0-5 millisecond range for repeated requests.
There's a famous adage among software engineers - "There are only two hard things in Computer Science: cache invalidation and naming things." (credited to Phil Karlton). In a more advanced application, we would have to worry about cache invalidation - or selectively removing entries from the cache in order to serve updated data. Luckily for us, our API is read-only, so we never actually have to worry about updating the cache. Score! If you use this technique in an app that is not read-only, keep in mind that Redis allows you to set the expiration timeout of entries using the "SETEX" command.
9.3 - Redis-CLI Primer
We can use the redis-cli to monitor the cache status and operations.
redis-cli monitor
This command will provide a live-feed of Redis operations. If we start making requests with a clean cache, we'll initially see lots of "set" commands, with resources being inserted in the cache. On subsequent requests, most of the output will be "get" commands, since the responses will have already been cached.
We can get a list of cache entries with the --scan flag.
redis-cli --scan | head -5
/kingdoms/2/summary
/locations/294/summary
/locations/town
/kingdoms
/locations/region
To directly interact with our local Redis instance, we can launch the Redis shell by running redis-cli.
redis-cli
We can use the dbsize command to check how many entries are currently cached.
127.0.0.1:6379> dbsize
(integer) 15
We can preview a specific cache entry with the GET command.
127.0.0.1:6379> GET /kingdoms/2/summary
"{\"summary\":\"The Iron Islands is one of the constituent regions of the Seven Kingdoms. Until Aegons Conquest it was ruled by the Kings of the Iron ...}"
Finally, if we want to completely clear the cache we can run the FLUSHALL command.
128.127.0.0.1:6379> FLUSHALL
Redis is a very powerful and flexible datastore, and can be used for much, much more than basic HTTP request caching. I hope that this section has been a useful introduction to integrating Redis in a Node.js project. I would recommend that you read more about Redis if you want to learn the full extent of its capabilities - https://redis.io/topics/introduction.
Next up - The Map UI
Congrats, you've just built a highly-performant geospatial data server!
There are lots of additions that can be made from here, the most obvious of which is building a frontend web application to display data from our API.
Part II of this tutorial provides a step-by-step guide to building a fast, mobile-responsive "Google Maps" style UI for this data using Leaflet.js.
For a preview of this end-result, check out the webapp here - https://atlasofthrones.com/
Visit the open-source Github repository to explore the complete backend and frontend codebase - https://github.com/triestpa/Atlas-Of-Thrones
I hope this tutorial was informative and fun! Feel free to comment below with any suggestions, criticisms, or ideas about where to take the app from here.